Learn how to import data for new and existing records into Vernon CMS with XML Import. This tool can save you heaps of time. There’s a bit of a learning curve, but it’s so worth it. Read on!

How XML Import can help you
You might have acquired a lot of new objects into your collection. Or you might be moving data from an old system into Vernon CMS. So you might have tens, hundreds, thousands, or dare we say, tens of thousands of new records to create. Imagine doing that manually!
Or you might have new valuation data for your collection. Perhaps you’ve audited your data and noticed gaps? Again, this could be many thousands of records to update.
You can use XML Import to get this data swiftly into Vernon and save yourself significant time. You’ll enter data in Excel, then create an XML file which you’ll import. There are a few tricks and techniques to learn, but it’s an investment of your time that will pay off again and again.
Things to note
Import to one file at a time
You can only import data into one file at a time. So if you want to import data into the Person file and the Object file, you’ll have to do two separate imports.
Order your imports
If you have a bunch of new objects and makers, then it’s wise to do the Person import first. This way, you’ll have System IDs for all your Person records, which you can then include in the Object import. Similarly, if your Object import references a lot of new terms in an authority file, you could use XML Import to bulk create the new terms first.
Include the System ID or accession number of each record
If you’re importing data to existing records, you need to include the System ID or accession number of each record. Generally, it’s better to use the System ID as it’s more accurate and precise.
You can get the System ID or accession number for existing records in a couple of ways:
If you’re creating new records, and you want to include the accession number, make sure that format already exists in Vernon.
Include mandatory fields
If you’re importing data into a table with mandatory fields, such as the valuation table, you’ll need to include the mandatory fields in your import.
Mandatory valuation fields are:
- Type
- Method/Basis
- Value
- Date
If you are creating new Person records, you must include these fields:
- Record Type
- Person/Corporate Type
Use bulk location tools for location updates
You can’t use XML Import for bulk location updates. Instead, use Bulk Move, Bulk Inventory, or Batch Location Change.
Steps to do an XML Import
First, let’s look at the main parts of the XML Import process.
- Prepare your data
- Set up the import configuration
- Import your data
We’ll go through each of these parts in detail using an example of importing valuation data to existing records. You can also then watch a video or read step-by-step technical instructions for each part.
Part 1: Prepare your data

Overview
- The first part is to prepare your data in the XML Import spreadsheet that comes with Vernon.
- You’ll need to create a column for each field, and a row for each record.
- If a column has multiple entries, these need to be split into separate columns.
- Then you’ll generate an XML file that you’ll import into Vernon.
Find and copy the XML Import spreadsheet
Go to your Wincoll folder, which is where Vernon CMS is located. Go to the TOOLKIT folder, then copy the XMLimport.xlsm file and paste it somewhere.
The reason you make a copy is to preserve the original template for other people to use. Rename the copy, especially if you’re going to do several imports. For example, XMLimport-valuations.xlsm.
Open the copied spreadsheet and enable macros
Open the copied spreadsheet and you’re ready to go.
The XML Import spreadsheet uses a macro to generate the XML file. So you’ll need to enable macros. On the security warning, click Enable Content.
There are two tabs on the spreadsheet: Control and Data.
Go to the Data tab.
Create column headings
Every column on the Data tab represents a field, and every row (except the header row) represents a record.
Add column headings for each field you want to update. Remember, if you’re updating existing records, include the System ID or accession number.
The column heading names should be meaningful to you and describe what the field is. They don’t have to be the exact internal field name of the fields in Vernon because you’re going to have to manually match them in the configuration anyway.
Use lowercase without spaces (or with underscores instead of spaces). For example, use method or valuation_method for the Valuation Method field.
Enter your data
Make sure you don’t have any blank rows or columns in the middle of your spreadsheet.
Use System IDs for authority fields
It’s a really good idea to use System IDs for terms that you want to import into authority fields. System IDs will give Vernon an exact match and your import will go more smoothly.
For example, you might want to import data into the Artist field on the Object file. Enter the System ID of the Person record, rather than type the name into your spreadsheet.
Typing words is prone to error. You also might have more than one maker with that name or part of the name, in which case Vernon will pause during the import and ask you to confirm which one you want.
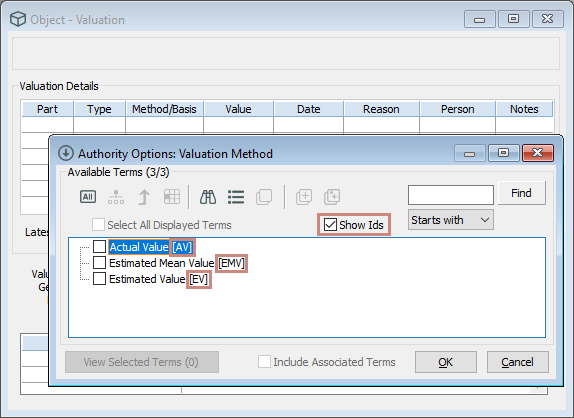
You can see the System ID for a term in the Authority Options window for that field. Make sure you tick Show IDs.
Use numbers in column headings for multiple values in a field
Multi-value fields allow you to enter more than one row of data. For example, multiple valuations in the Valuations table.
Make sure that you give each column heading a unique name. In this example, we’ll include these column headings:
- value_1
- method_1
- type_1
- date_1
- value_2
- method_2
- type_2
- date_2
Generate the XML file
When your data is ready, go to the Control tab. In the Destination field, enter a name and location for the XML file that you’re about to generate. The file name must end in .xml. For example:
C:\Temp\XMLimport-valuations.xml
Click the Generate button, and your XML file is created!
Video
Part 2: Set up the import configuration

Overview
Alright! We are ready for Part 2. This is probably the most challenging stage to learn.
We are going to:
- Create an XML Import Configuration record.
- Tell Vernon what file we want to import into.
- Tell Vernon what XML file to use.
- Map the column headings from our Excel spreadsheet to Vernon fields.
- Tell Vernon if these are new or existing records.
There’s a little more to it, but we’ll get to that.
Open the XML Import Configuration window
Go to the Tools menu, then XML, then XML Import, then Configuration.
Enter basic information about the import
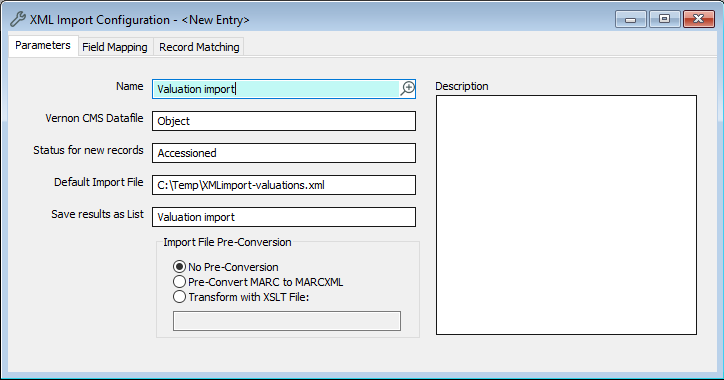
- First, let’s give your import configuration a name. Enter a descriptive name in the Name field, such as Valuation import.
- Next, tell Vernon which field you want to import to in the Vernon CMS Datafile field. So if you’re importing to the Object file, enter Object in this field.
- Vernon wants to know the status for new records, even if you’re not creating new records. Most likely, in Status for new records, you’ll want to enter Accessioned.
- Now let’s tell Vernon which XML file to use for the import. In the Default Import File field, click the little folder icon to find your XML file.
- It’s a good idea to save your import as a list. That means you can easily open or export those records if you need to. In the Save results as List field, enter a list name.
Let’s map the fields
Go to the Field Mapping tab. This is where you’re going to tell Vernon a bunch of stuff like:
- Which fields to import data into.
- Whether you want to replace or append the data.
- How to align the data into rows if the data is going into a table.
- What static data to add (data that is the same for every record).
Get the element headings (column headings) from your XML file
If you’re on Vernon CMS version 12.4 or higher, there’s a handy button that will save you some time. It’s called Get element headings from XML file and it’s the first button under Fields, above the table. Click this button.
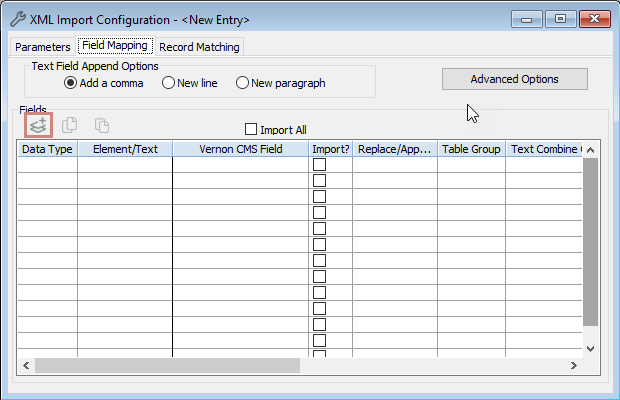
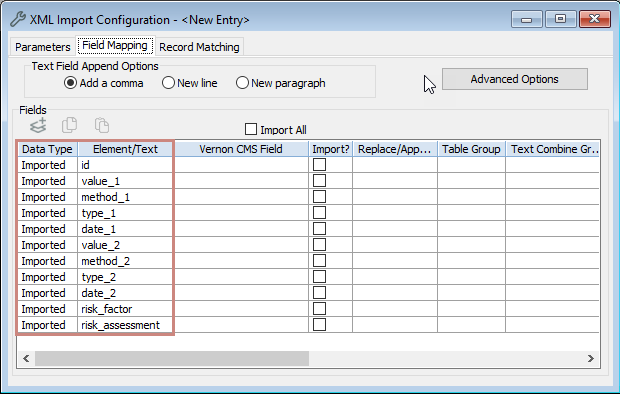
Wahoo! A lot of the work is done for you. Vernon has inserted the element headings (the column headings from your spreadsheet) into the Element/Text column and specified that the Data Type is Imported.
Map the element headings to Vernon fields
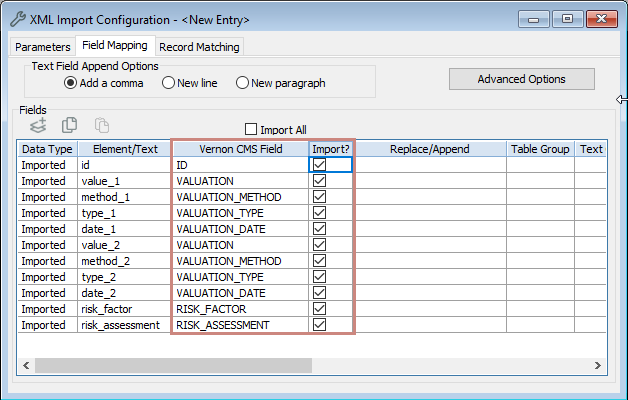
In the Vernon CMS Field column, for each element or text, enter the corresponding internal field name.
Depending on how many fields you’re mapping, this step can be a bit tedious!
There’s a couple of ways to enter the field name:
- Type part of the field label, such as valuation, and hit Enter. A list of fields will come up for you to choose from.
- Click the Options button. A list of all fields will come up, which you can scroll through. You can also click Search to search within the list.
If you already know the internal field name, then you can type it directly into the field. You probably watch a lot of Vernon CMS webinars and know that you can click into a field, then go to the Help menu and click Database Information to see the internal field name. You should also give yourself a big pat on the back because you are becoming very knowledgeable about Vernon!
If you’re importing more than one piece of data into a field, enter the same internal field name for each column heading. For example, enter VALUATION_METHOD for both method_1 and method_2.
Make sure the box in the Import? column is ticked for each field you want to import.
Choose to replace or append the data
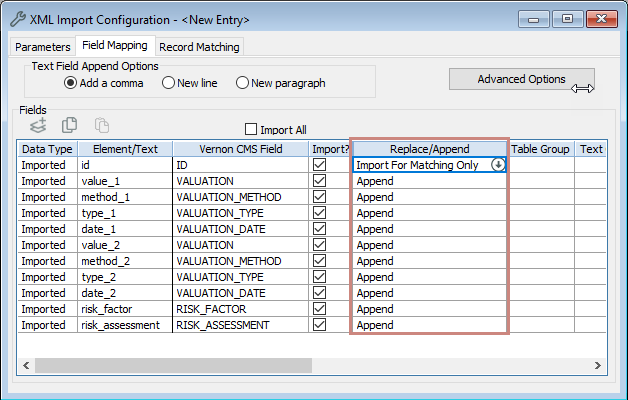
The next step is to tell Vernon in the Replace/Append column whether you want to replace or append the data in the field. Generally, if you just click into each row in that column, Vernon will automatically insert the right option. But let’s talk a bit about what each option means.
Whether you use Replace or Append depends on whether the field is a single-value field or a multi-value field.
- In a single-value field (such as Date Accessioned), you can only replace the data when importing. Choose Replace even if you’re importing new records.
- In a multi-value field, where you can have multiple entries (such as Department), you can only append the data (add it to the next row) when importing.
If you’re importing data to existing records, for the ID field name (or ACCESSION_NO field name), select Import for Matching Only.
If you’re importing new records, for the ACCESSION_NO field name, select Replace.
Enter any static data
Static data is extra data that will be the same for every record. For example, an import of new Object records might all be in the Social History department.
You can use the Data Type of Static Data to enter the department name or System ID in the Element/Text column. The data must be in double quotes (for example, “Social History”).
Valuation data imports typically use static data for fields such as Valuation Type, Method, Reason, Valuer, and Date.
Enter Table Group numbers for data in tables
If you’re importing data into tables, you’ll need to tell Vernon how to align the data in rows. Vernon CMS is an amazingly powerful system, but it can’t read minds!
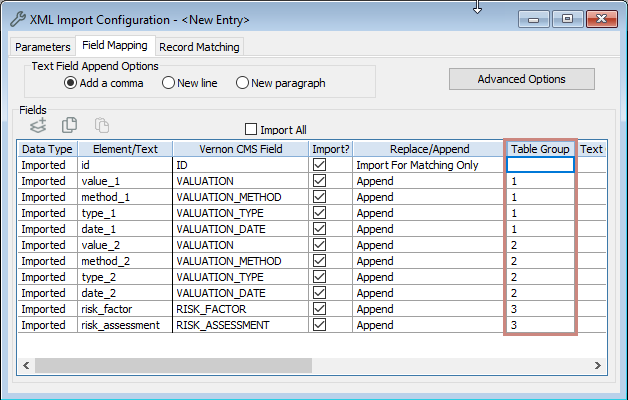
Basically, you’re going to group sets of data together. For a set of data that will be aligned in one row of a table, enter a number into the Table Group column for each piece of data. It can be absolutely any number, it just has to be the same number.
For example:
- If you’re importing valuation data, you could give each valuation field the number 1.
- If you’re importing a second set of valuation data in the same import, give each of those fields the number 2.
- If you’re also importing data into the risk table, give each field the number 3. Or if you’re feeling frivolous, the number 42. Again, it doesn’t matter what the number is, so long as you use the same number for each set of fields that will be an aligned row in a table.
Even if you’re only importing data into one field in a table, you have to give it a Table Group number.
Tell Vernon if they’re new or existing records
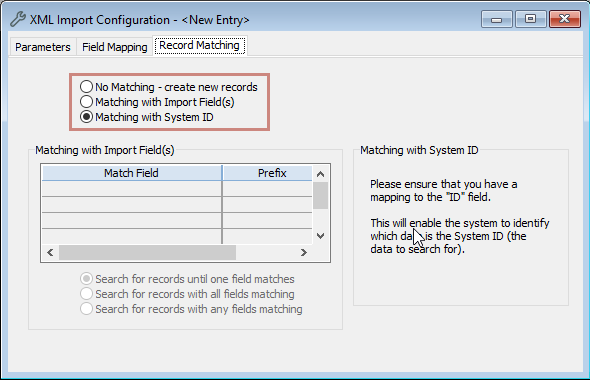
Next, go to the Record Matching tab and choose either No Matching – create new records, or in this case, Matching with System ID.
Save your configuration record
Save your hard work by clicking Save in the toolbar. Phew!
Video
Part 3: Import your data

Overview
In our final stage, we will import the data into Vernon. This part is actually pretty fun and satisfying — if you’ve set up your import correctly!
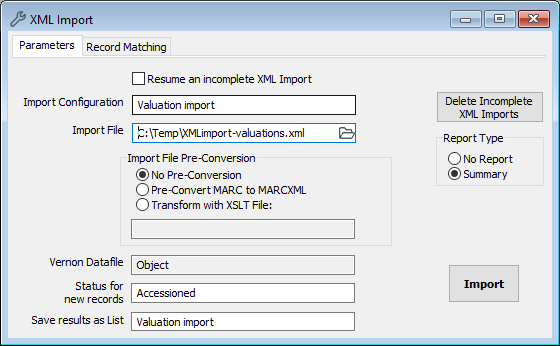
Open the XML Import window
Go to the Tools menu, then XML, then XML Import, then Import.
Specify the configuration
This is where we tell Vernon which configuration to use for the import.
In the Import Configuration field, enter the name of the import, or click the Options button to select it from the list of all configuration records.
Vernon will automatically insert data into the other fields.
Run your import
The moment has arrived. The exciting and slightly terrifying point where you will trust yourself that you did all the right things and are ready to commit.
Click the Import button.
Monitor your import
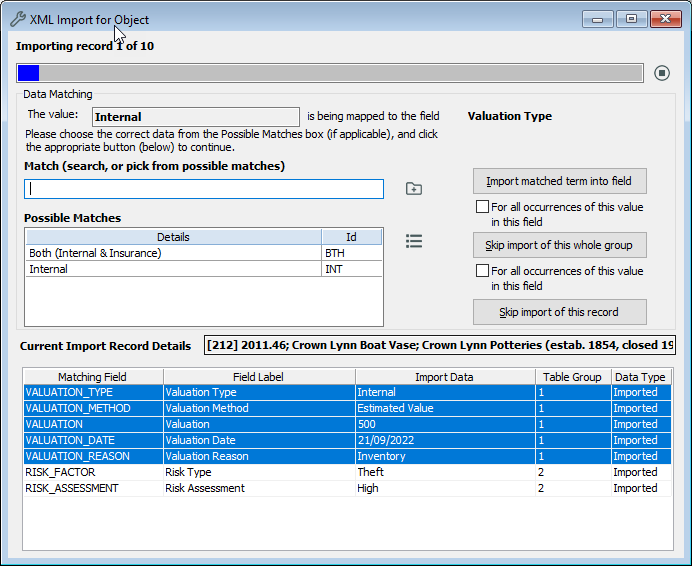
Vernon will start importing and you can enjoy watching it tick through the records at a brisk pace.
You should keep an eye on the XML Import window. If Vernon comes across a piece of data where it’s not sure what to do, it will pause the import, ask you about it, and wait for your response. This could be a piece of invalid data, it could be data where there is more than one match, it could be a mandatory field requirement.
Fix issues with your data and keep importing
If Vernon comes across any issue, you can fix the data and keep importing, or skip that particular value or record and come back to it later.
Video
Congratulations!
You did it! You gained new skills and confidence, and now you understand more about how Vernon works. Most importantly, you saved yourself time that you can give back to caring for your collection.
What the heck is XML anyway?
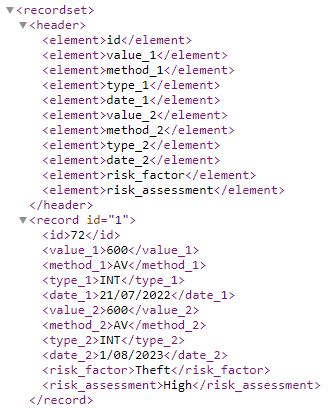
XML stands for Extensible Markup Language. It’s a tool for storing and transporting data. Excel files can’t be imported directly into Vernon, so instead we use it to output the data in XML format.
XML is just structured data. You’ll never need to look at it, but if you really want to know, here’s a portion of that helpful file we created back in Part 1.
Want more?
Check out this 40-minute webinar on the whole XML Import process, which shows several examples of imports.
Learn some tips on using Excel to manage your XML import data in this 15-minute webinar from Auckland Museum.
Questions?
Read our full guide on the Vernon CMS Help website:
Create or update records in bulk with XML Import
Email support@vernonsystems.com. We’re happy to help.


[…] Learn about XML Import […]